How to Integrate Govee Lights with Home Assistant (Local Control Setup)
Why Your Govee Lights Won't Talk to Home Assistant (And How to Fix It)
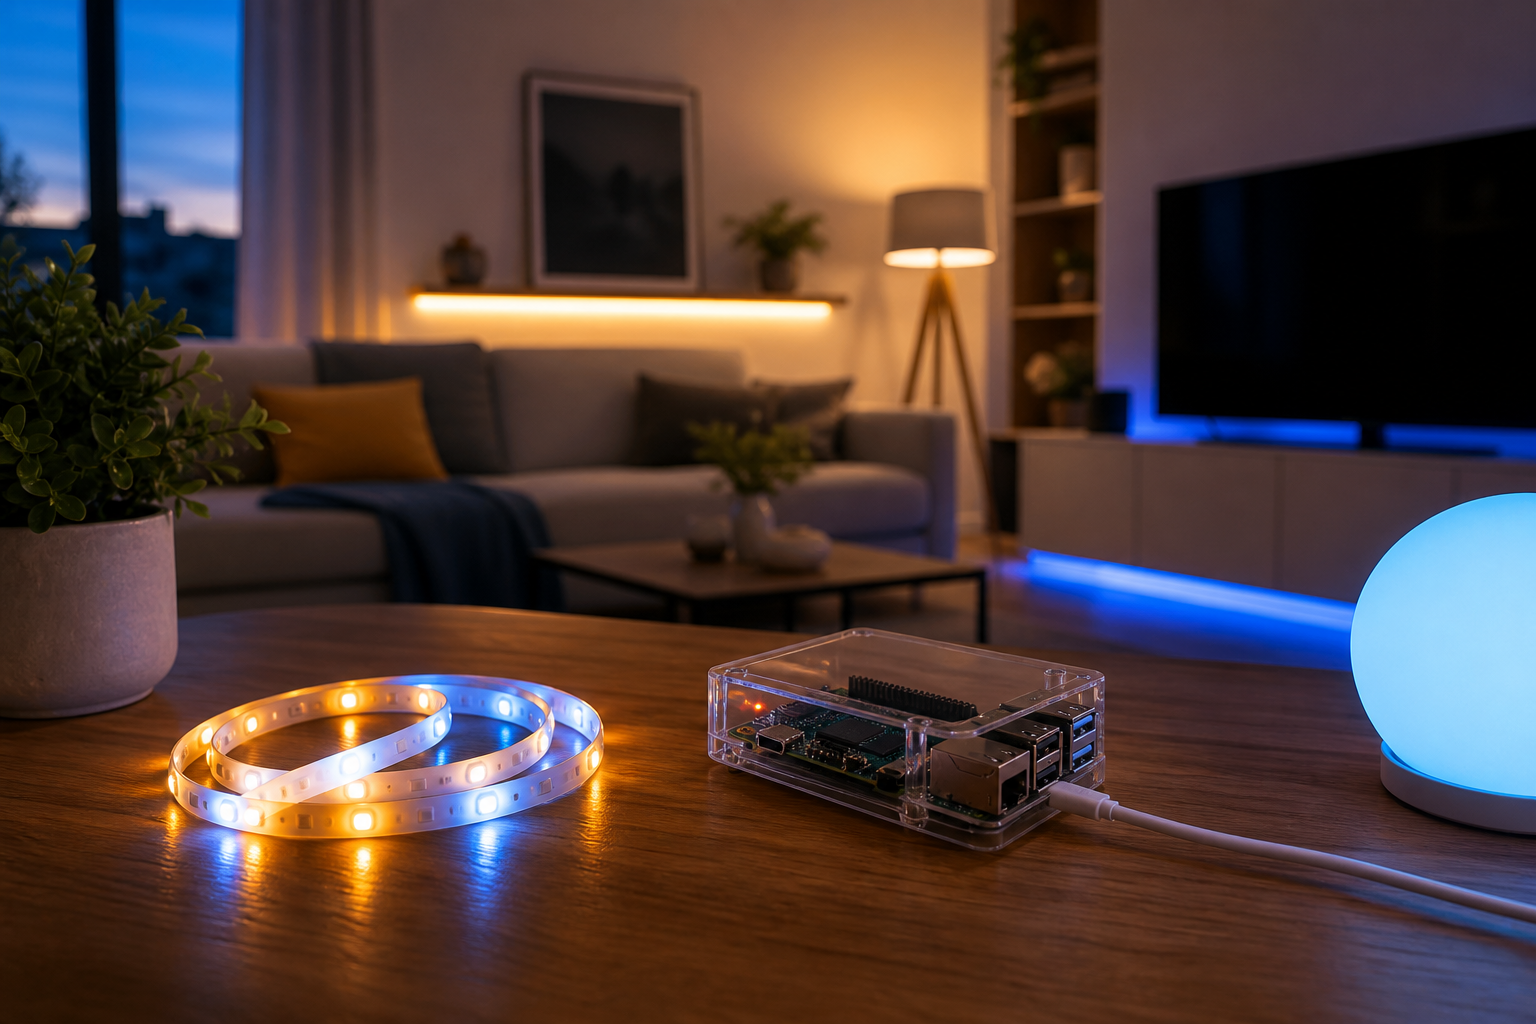
You bought Govee LED strips because they're inexpensive, bright, and the app makes them easy to set up. You run Home Assistant because you don't want your living room lights phoning a server in another country every time you flip a switch. Then you tried to wire the two together — and the built-in "Govee" integration either failed to discover anything or demanded a cloud API key, defeating the entire point. A working govee home assistant integration that respects your local-first setup is absolutely achievable, but the default path in Home Assistant isn't it.
The pattern is documented across forums. Users on the Home Assistant Community Forum report the official integration returning "No devices found on the network," then getting instant discovery the moment they switch to a community LAN integration. The good news: Govee devices ship with a LAN API that supports true local control. The catch: it's gated behind a per-device toggle, firmware version dependencies, and model-specific support that isn't obvious from product listings, as Selora Homes warns.
This guide walks you through two viable installation paths — govee-lan-hass via HACS, and govee2mqtt via an MQTT bridge — plus the pre-flight checks that decide whether either will work for your specific lights.

Table of Contents
- Why Govee's Default Setup Breaks the Home Assistant Promise
- Pre-Flight Compatibility & Firmware Check (Don't Skip This)
- Choosing Your Integration Path: Direct LAN vs. MQTT Bridge
- Path A: Installing govee-lan-hass via HACS
- Path B: Installing govee2mqtt for MQTT-Based Setups
- Troubleshooting the Six Most Common Govee + Home Assistant Failures
- Locking Down Govee Lights on Your Network (VLAN, Firmware, Credentials)
- Automations That Actually Make Local Control Worth It
- Your Govee + Home Assistant Local Control Verification Checklist
Why Govee's Default Setup Breaks the Home Assistant Promise
The architecture problem is concrete. The default Govee integration shipped with Home Assistant requires a Govee cloud API key. Every "turn on" command travels: HA → your internet uplink → Govee servers → back through internet → device. Every state report makes the same round trip. The creator behind the YouTube walkthrough "Govee + Home Assistant Integration Made EASY! (And Mostly Local …)" puts it bluntly: "none of this should be necessary" to control lights you own and pay to power.
Three concrete consequences follow.
Latency. When a command crosses the internet twice, it's noticeably slower than a LAN call. Community sources consistently describe cloud-routed control as sluggish and LAN integrations as "snappier" and reliable when internet is down — both Selora Homes and The Smart Home Journey describe the difference qualitatively. Precise millisecond benchmarks aren't published in either source, but in practice the gap is large enough that motion-triggered lighting feels broken on cloud and immediate on LAN.
Reliability. When Govee's cloud experiences an outage, your cloud-routed automations stop. Your motion sensors still fire, your time-based triggers still evaluate, but the commands hit a closed door. LAN-controlled lights keep working as long as Wi-Fi is up. If you've built routines that matter — security lighting, late-night nightlights, status indicators — you don't want them dependent on a third party's uptime.
Privacy. Every cloud command leaves a record in Govee's infrastructure. State changes, brightness levels, color choices, the timing of when you walk into rooms. The LAN protocol keeps that traffic on your network where it belongs.
Govee does ship a LAN API on supported devices. It's gated behind a per-device toggle in the mobile app and tied to firmware version. The H6076 reviewer at The Smart Home Journey waited roughly one month for firmware 1.04.06 to land before the "LAN Control" toggle even appeared in their app — a real example of the dependency on vendor OTA rollout.
Every cloud-routed light command makes a round trip your network is fully capable of avoiding. The LAN API has been in your Govee devices the whole time — Home Assistant just needs the right integration to find it.
Home Assistant's local-first philosophy applies equally to other device categories — see our guide to Best Smart Plugs for Home Assistant in 2026 (Local Control, No Cloud) for the same architectural approach applied to switching loads.
Two community paths get you there. govee-lan-hass installs through HACS and talks directly to the LAN API. govee2mqtt runs as an add-on or container, bridges to Govee devices over LAN, and exposes them through MQTT. The rest of this guide covers both.
Pre-Flight Compatibility & Firmware Check (Don't Skip This)
The single most common failure mode isn't the integration — it's attempting integration on a model that doesn't expose LAN Control, or one that does but ships with outdated firmware. Selora Homes explicitly warns that "only specific Govee models support local LAN control," and compatibility is not obvious from product listings. Run this five-item checklist before you touch HACS or Docker.
Confirm your device model has a LAN Control protocol implementation. Cross-check the supported device list in the govee-lan-hass GitHub repo and the govee2mqtt project notes. Confirmed working models from the research include the H6076 (after firmware 1.04.06, per The Smart Home Journey) and the Glide Y series. If your model isn't on either list, no integration will rescue it — the protocol isn't there to talk to.
Update firmware to the latest available version. Open Govee app → Device → Settings → Firmware. The H6076 example is instructive: LAN Control only appeared after firmware 1.04.06 rolled out, and the reviewer waited roughly a month for the OTA push to land. If you've never updated, your device may be several versions behind. Check before you start.
Switch the device from Bluetooth to Wi-Fi mode. Some Govee devices default to Bluetooth-only pairing during initial setup. LAN control requires the device on Wi-Fi. Use the 2.4 GHz band — most Govee devices don't support 5 GHz and will fail to associate if your router pushes them onto the wrong radio.
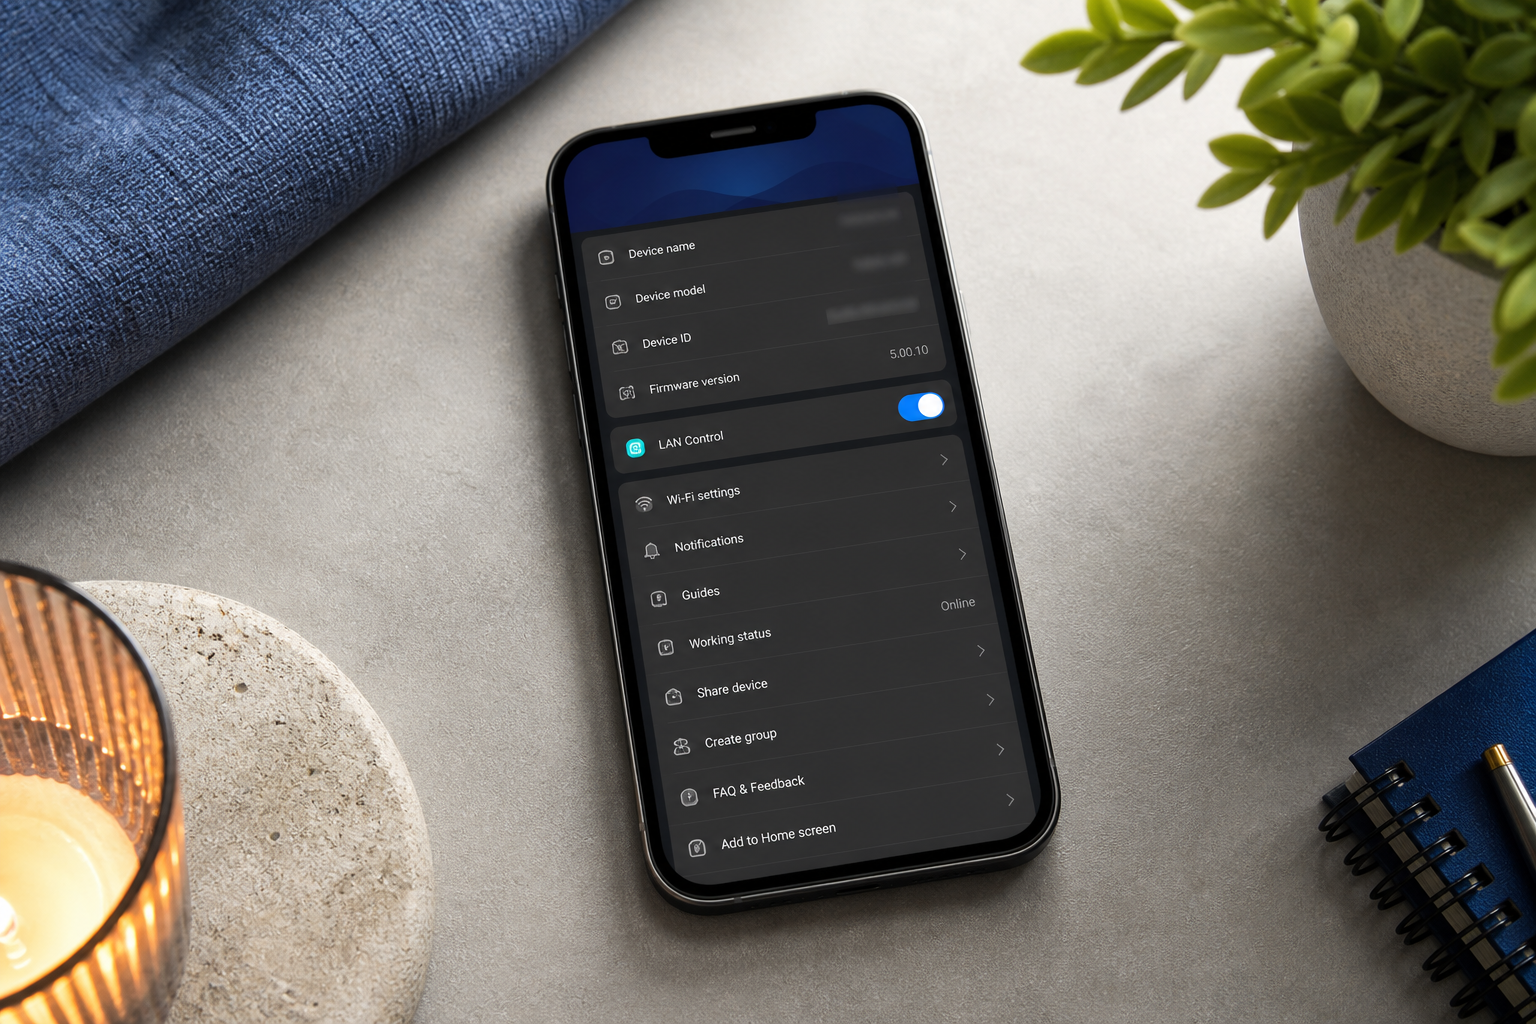
Toggle "LAN Control" ON in the Govee app device settings. This is per-device, not account-wide. Open the device in the Govee app, find the settings page, and confirm the LAN Control switch is on. If the toggle isn't visible, either the firmware isn't recent enough or the device doesn't support the LAN protocol at all. The govee-lan-hass author documents this as the single most common cause of "discovery fails" reports.
Confirm Home Assistant and Govee devices share the same broadcast domain. Govee LAN discovery uses UDP broadcast, not unicast. If you've placed IoT devices on a separate VLAN — a perfectly sensible security choice — broadcast traffic won't traverse routers by default. You'll either configure a UDP broadcast relay or you'll use govee2mqtt's manual IP scan override (covered in Path B).
This checklist is the difference between a 15-minute setup and a 3-hour debugging session. The forum thread linked earlier is full of users whose "broken integration" symptom traced back to one of these five preconditions — most often a missing LAN Control toggle or a VLAN that swallowed the discovery broadcast. Spend ten minutes on the checklist now and you'll save hours later.
Choosing Your Integration Path: Direct LAN vs. MQTT Bridge
Two community paths exist for a working govee home assistant integration with local control. The decision turns on three questions: do you already run MQTT, how much add-on complexity do you tolerate, and does your network topology force manual IP configuration?
| Criteria | govee-lan-hass (HACS) | govee2mqtt (MQTT Bridge) |
|---|---|---|
| Installation surface | HACS custom integration | Add-on or Docker + MQTT broker |
| Cloud credentials | None reported in setup | Govee email, password, API key |
| Transport | Direct LAN API calls | LAN API → MQTT topics |
| HA discovery | Devices & Services flow | MQTT auto-discovery |
| Web UI for bridge | No | Yes |
| Manual IP override | Not documented | GOVEE_LAN_SCAN=<ip>,<ip> |
| Best for | Minimal moving parts | MQTT users, segmented networks |
Start with govee-lan-hass for most situations. It has fewer dependencies, doesn't require obtaining a Govee API key, and matches the local-first reason you chose Home Assistant in the first place. If you've already wired up Home Assistant + Wyze Integration, you'll recognize the same custom-integration-via-HACS pattern here — install HACS once, add the repository, configure through the UI.
Choose govee2mqtt instead when one of three conditions applies. First, you already run MQTT for other devices like Zigbee2MQTT or ESPHome — adding another producer to an existing broker is cheap. Second, your network is VLAN-segmented and UDP broadcast won't reach across subnets — The Smart Home Journey author bypassed exactly this problem by setting GOVEE_LAN_SCAN=192.168.3.25,192.168.3.26 to force the bridge to probe specific IPs. Third, you want the bridge's web UI for at-a-glance status visibility. The YouTube creator's critique still holds — needing an MQTT broker, a bridge add-on, AND a Govee API key for "mostly local" control is more friction than the product category should demand — but for tricky network topologies, it's the most field-proven path.

Path A: Installing govee-lan-hass via HACS
This is the recommended primary path. It assumes Home Assistant is running but does not assume HACS is installed.
Step 1: Install HACS (if not already installed). HACS is the community add-on framework that hosts third-party integrations like govee-lan-hass. The current installation method is documented in the official HACS docs and includes a one-time GitHub device authorization step. Don't try to memorize the steps from a year-old tutorial — installation specifics change, so follow the official instructions, then come back here.
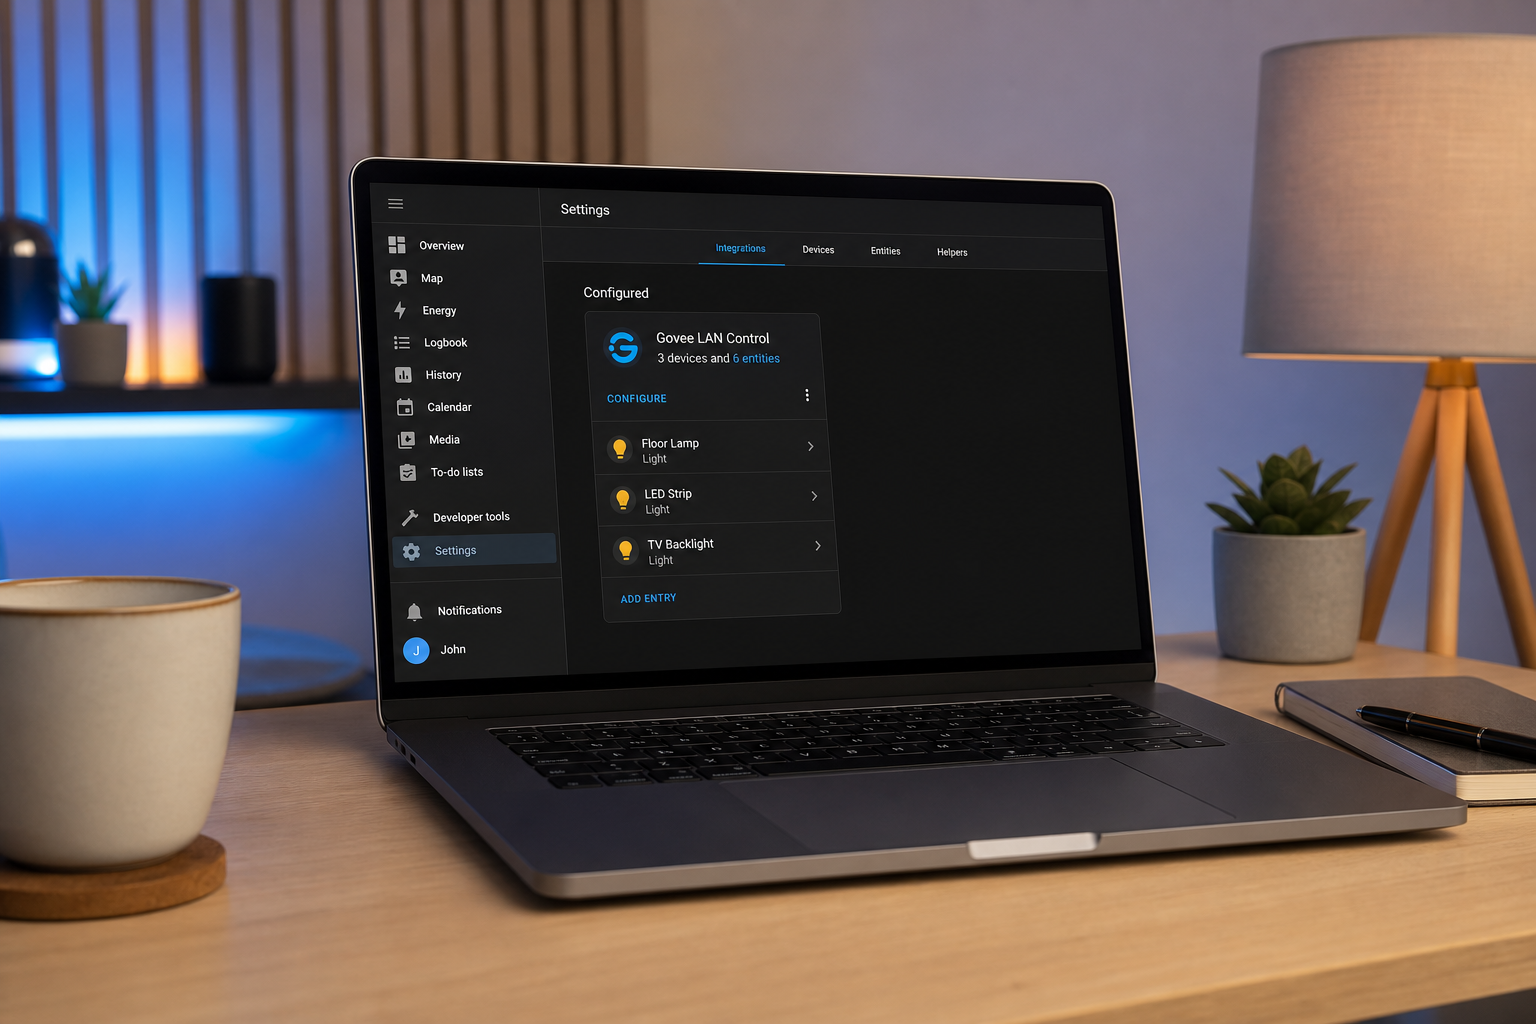
Step 2: Add the govee-lan-hass repository to HACS. Once HACS is installed and authenticated, go to HACS → Integrations → three-dot menu in the top right → Custom repositories. Paste https://github.com/wez/govee-lan-hass into the repository field, select Category: Integration, and click Add. The repository now appears in HACS's index. Search HACS Integrations for "Govee LAN Control," open the listing, and click Download. Restart Home Assistant when prompted — the integration won't load otherwise.
Step 3: Add the integration in Home Assistant. After the restart, navigate to Settings → Devices & Services → Add Integration. Search for "Govee LAN Control" and click the result. The integration immediately broadcasts a UDP discovery query on your LAN. Wait 30 to 60 seconds. If your devices passed the Section 2 checklist and live on the same broadcast domain as Home Assistant, they'll appear in the discovered devices list automatically. No YAML required.
Step 4: If auto-discovery fails — manual diagnosis. First, re-verify each item in the pre-flight checklist. If the LAN Control toggle is on, firmware is current, and the device is on Wi-Fi, the next suspect is your network topology. Confirm HA and the Govee device share the same subnet by checking the device's IP in your router's DHCP table. If you've segmented IoT onto its own VLAN, you have two options: configure a UDP broadcast relay on your router (some firmware like OPNsense supports this natively, others need a helper service), or switch to govee2mqtt in Path B, which supports manual IP overrides without needing broadcast relay.
Step 5: Assign devices to areas and rename entities. In Devices & Services → Govee LAN Control, click each device, assign it to a Home Assistant Area (Living Room, Kitchen, Bedroom), and give it a friendly entity name. Default names like light.govee_h6076_a1b2c3 are useless in voice commands and automations — rename to light.living_room_strip or similar. Do this once now and your automations will read cleanly forever.
Step 6: Verify true local operation. The proof that you've achieved actual local control is the WAN-disconnect test. Toggle the light from the HA UI to confirm it works. Then physically unplug your router's WAN port (the cable from your modem or ONT). Toggle the light again from HA. If it still responds, the command traffic is staying on the LAN and you've succeeded. If it stops working, something is still routing through the cloud — usually a misconfiguration where the official Govee integration is also installed and intercepting commands.

For most readers with a flat home network, that's the entire setup. Fifteen minutes, no broker, no API key, no cloud round trips.
Path B: Installing govee2mqtt for MQTT-Based Setups
Choose this path when you already run MQTT for other devices, when your network is segmented and UDP broadcast won't traverse, or when you want the bridge's web UI for visibility.
Step 1: Install the Mosquitto MQTT broker add-on. Navigate to Settings → Add-ons → Add-on Store and search for "Mosquitto broker." Install and start it. This is the official Home Assistant MQTT broker, referenced in the tutorial walkthrough by the YouTube creator covering this exact workflow. Once Mosquitto is running, create a dedicated MQTT user under Settings → People (or Users in newer HA versions) — the bridge will authenticate against this user, not your main HA account. Note the username and password; you'll need them in Step 3.
Step 2: Obtain a Govee HTTP API key. Open the Govee app → Profile → "Apply for API Key." Enter your name and a reason ("Home Assistant integration" is fine). Govee emails the key, typically within a few minutes to a few hours. This step does involve Govee account credentials, and the YouTube creator's critique applies — needing a cloud API key for "mostly local" control is friction the product category should have eliminated years ago. The bridge still requires it for initial device enumeration, even though ongoing command traffic stays on the LAN.
Step 3: Install the govee2mqtt add-on or Docker container. For Home Assistant OS users, add the govee2mqtt repository to your add-on store, install the add-on, and open its configuration page. For Docker users, pull the container per the project README. The configuration requires: your Govee account email, your Govee account password, the Govee HTTP API key from Step 2, the MQTT broker host (typically homeassistant.local or its IP), the MQTT username and password you created in Step 1, and the MQTT port (1883 unless you've changed it). Save and start the add-on. Watch the log output — successful startup shows device enumeration followed by MQTT publishes.
Step 4: Handle segmented networks with manual IP scan. If your Govee devices live on a different VLAN than Home Assistant, UDP discovery broadcast will fail across the router boundary. Add the GOVEE_LAN_SCAN environment variable to the add-on configuration with a comma-separated list of device IPs — for example, GOVEE_LAN_SCAN=192.168.3.25,192.168.3.26, the exact syntax The Smart Home Journey author used to bypass UDP failures on a segmented network. This forces the bridge to probe specific IPs instead of relying on broadcast. You'll need to either reserve static DHCP leases for each Govee device or accept that you'll update the list if IPs change.
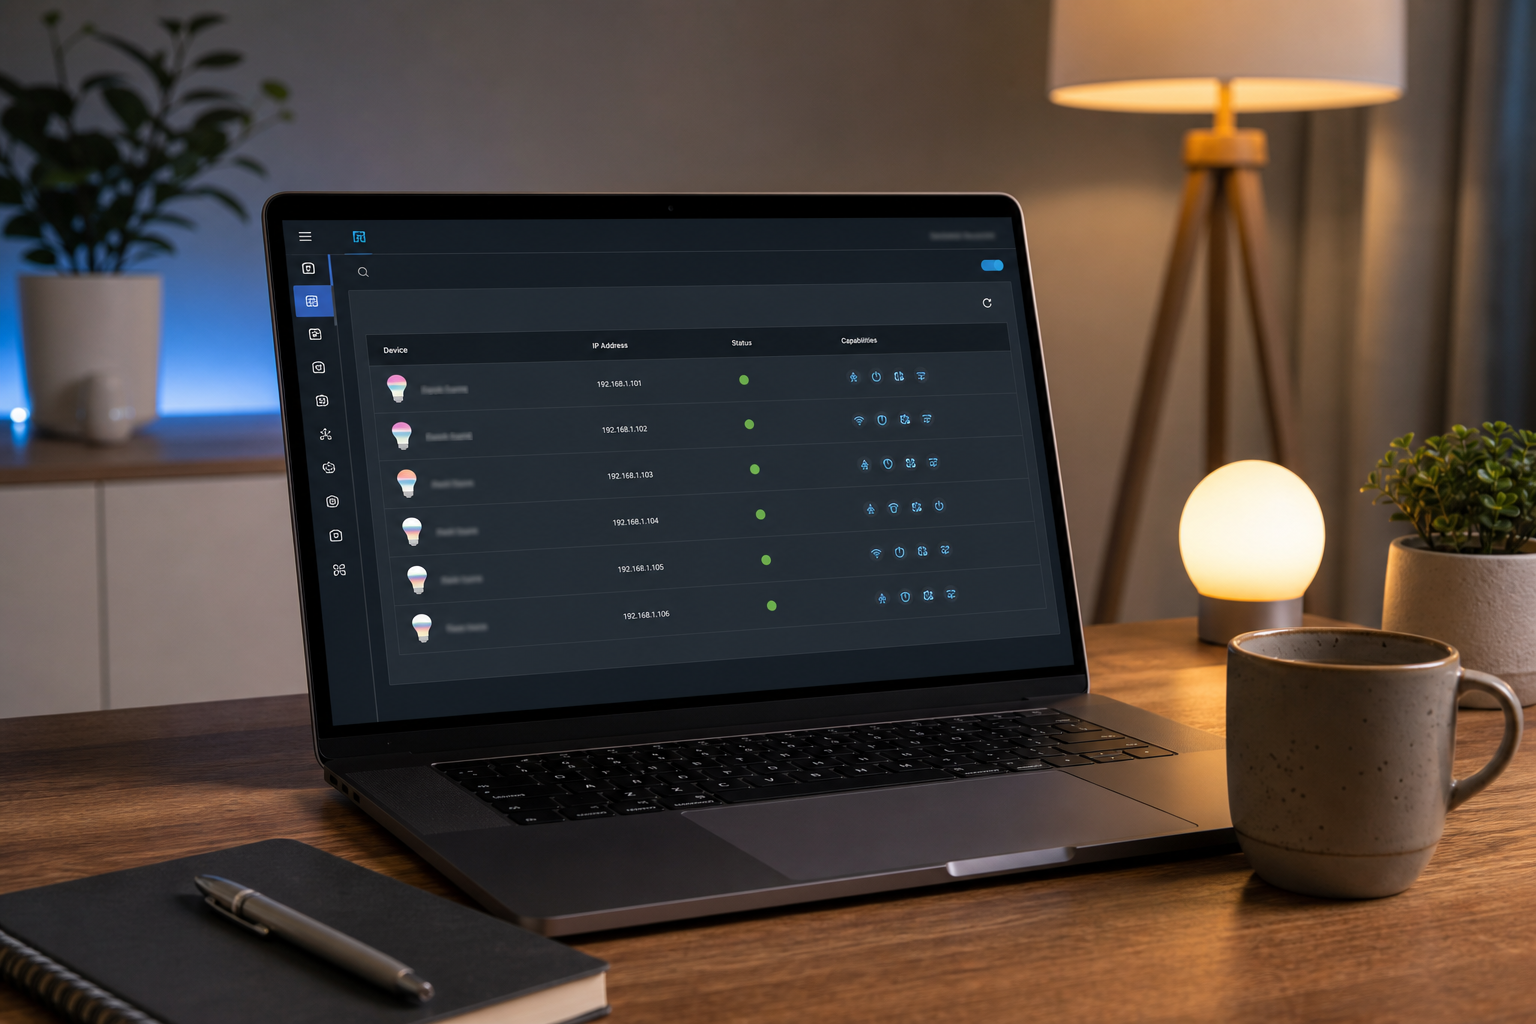
Step 5: Verify MQTT auto-discovery in Home Assistant. Open Settings → Devices & Services → MQTT integration. A new device labeled "govee2mqtt" should appear with attached light entities — one per Govee device. Toggle a light from the HA UI. Then open the Mosquitto add-on logs and the govee2mqtt logs in parallel. You should see MQTT messages flowing on the broker — this verification approach is the same one the Aqara Community Forum contributor documented when validating a similar setup. If you see commands published but no state updates, the device might not be reachable on the network — go back to Step 4.
Step 6: Confirm local-only operation. Run the WAN-disconnect test from Path A — unplug the internet uplink and verify lights still respond to HA commands. One honesty caveat: govee2mqtt may make an initial cloud call on bridge startup to enumerate devices and refresh tokens. Ongoing on/off/brightness commands run over LAN once that handshake is done, but if your requirement is zero cloud calls ever, govee-lan-hass is the stricter choice. For most users, "no cloud traffic during normal operation" is enough.
If everything works, congratulations — you've replaced a cloud-dependent integration with a local one that survives ISP outages, doesn't leak control data to a third party, and responds at LAN speed.
Troubleshooting the Six Most Common Govee + Home Assistant Failures
Real failures from real user reports, with the root cause and the fix for each.
"No devices found on the network" with the official Govee integration. The built-in "Govee" integration expects cloud API credentials and reportedly fails discovery in many configurations. Forum users solved this by uninstalling the built-in integration entirely and switching to "Govee Lights Local" or govee-lan-hass. If this is your symptom, you're on the wrong integration — the official cloud-bound one isn't going to magically start working. Remove it from Devices & Services and install one of the two community paths instead.
"LAN Control toggle missing in Govee app." Two causes. First, outdated firmware — update via Govee app and wait. OTA rollout isn't instant; the H6076 example showed roughly a month between firmware release and arrival on individual devices. Second, the model genuinely doesn't support LAN. Cross-check the supported device list in the govee-lan-hass repository. If your model isn't there and the toggle never appears even after firmware updates, no integration will fix it — the protocol isn't implemented on that hardware.
"Devices visible but commands don't respond." Almost always a Bluetooth-mode device. Govee LAN API only works when the device is on Wi-Fi, not when it's paired exclusively over Bluetooth. Open the Govee app, confirm the device is in Wi-Fi mode, and verify it's connected to a 2.4 GHz network — most Govee devices don't connect to 5 GHz. If your router uses band steering or a single SSID for both bands, force the device onto 2.4 GHz during setup.
"Auto-discovery worked once, then stopped." UDP broadcast can be unreliable across certain router firmwares. Check whether your router has "AP isolation" or "client isolation" enabled on the Wi-Fi network where Govee devices live — disable it for the IoT VLAN. If you've put IoT on a separate VLAN entirely, configure an mDNS/UDP broadcast relay or switch to govee2mqtt with manual IP scan. Multi-AP setups occasionally cause discovery to register a device on one AP and then lose it on roaming — assigning the device a DHCP reservation and using the bridge's manual IP override eliminates this class of failure.
"Lights work in HA but break in Govee app afterward." Often this is intended behavior when LAN Control claims the device exclusively. Reframe it as success: you're now controlling lights from Home Assistant, which was the goal. Leave the Govee app installed if you want it for occasional firmware updates, but treat HA as the primary control surface.
"Effects/scenes from the Govee app not available in HA." The LAN API exposes power, brightness, color, and a subset of effects, but not the cloud-processed scenes Govee advertises in marketing. If a specific effect is essential, you'll need to recreate it as a Home Assistant scene using available primitives, or accept that some Govee cloud effects can't be triggered locally. This is a real tradeoff — most users find the lost effects aren't worth the cloud dependency, but your judgment may differ.
The most common "broken integration" symptom isn't a broken integration at all — it's a missing toggle, an outdated firmware, or a VLAN that swallowed the discovery broadcast.
One final note on maintenance risk. Both govee-lan-hass and govee2mqtt are community-maintained projects. If Govee changes its LAN protocol in a firmware update, there may be a lag before the integration is updated to match — this is a genuine tradeoff versus official cloud integrations, which track vendor changes more closely. Mitigation: subscribe to the GitHub repository's release notifications and don't update Govee firmware aggressively the moment new versions appear.
Locking Down Govee Lights on Your Network (VLAN, Firmware, Credentials)
Once local control is working, the network security layer deserves the same care. Four practices, grounded in field experience.
Isolate Govee devices on a dedicated VLAN. The Smart Home Journey author places Govee lights and the Home Assistant server on a restricted VLAN that can reach only the internet and the HA server itself — no lateral movement into the main LAN, no access to file shares, no path to other devices. The conceptual setup: create an IoT VLAN on your router, place Govee devices and any other constrained Wi-Fi smart devices on it, configure firewall rules that permit only the Home Assistant server's IP to initiate connections into the IoT VLAN, deny IoT-to-LAN traffic entirely, and allow IoT-to-internet traffic for firmware updates only. This is the same posture you'd apply to any Wi-Fi smart device whose firmware you don't personally audit.
Block cloud egress if you're committed to local-only operation. Once govee-lan-hass is working and you no longer need the Govee app for daily control, firewall-block the IoT VLAN's outbound internet access. Your lights will keep working — they don't need cloud connectivity for LAN commands. The tradeoff is that firmware updates require a maintenance window where you temporarily re-enable internet access, push the OTA update, then re-block. Many practitioners find this acceptable; some don't. Choose based on how much you trust the vendor's firmware integrity.
Rotate Govee account credentials if you used govee2mqtt. Because govee2mqtt requires storing your Govee account email, password, and HTTP API key in the add-on configuration, treat those as service credentials. Use a unique password not reused on other accounts. If you ever leave the smart home setup behind — a sold property, a decommissioned account — revoke the API key and rotate the password. The credentials sit in a config file on your HA server; protect that file with the same care you'd give SSH keys.
Back up your Home Assistant configuration after the integration is stable. Settings → System → Backups. Configure automated weekly backups that include add-on data so the MQTT broker config, govee2mqtt configuration, entity customizations, and automation YAML are all captured. Hours of work go into getting an integration tuned correctly — protecting it costs nothing.
Network isolation matters even more for access control devices — see our Home Assistant Smart Locks: The Ultimate Privacy-First Buyer's Guide for the same VLAN approach applied to door hardware, where the security stakes are considerably higher than lighting.
This network posture isn't Govee-specific. Apply it to every Wi-Fi smart device on your network and the entire system becomes more resilient — a compromised light bulb can't pivot into your file server, and a compromised file server can't reach your lights.
Automations That Actually Make Local Control Worth It
Lights that work in HA are table stakes. The payoff of local control is fast, reliable automation. Four patterns where LAN speed and offline reliability actually matter.
Motion-triggered lighting where latency matters. A motion sensor triggers a Govee LED strip. With cloud routing, the round-trip can be slow enough that you've already walked past the sensor before the light comes on — the experience feels broken even when it technically works. With LAN control, the response is fast enough to feel immediate. A sample HA automation: motion sensor entity as trigger, condition limiting it to after sunset (use the sun integration), action light.turn_on on the Govee entity with a brightness value appropriate to the time. Add an auto-off after five minutes of no motion. This pattern only feels right at LAN speed.
Sunset-to-sunrise color temperature schedules. Use the sun integration's sun.sun entity as a trigger. At sunset, set Govee lights to warm white (2700K equivalent); at sunrise, off. The Govee app's cloud scheduler can do something similar, but it depends on the cloud, runs on Govee's schedule, and stops working when your internet does. In Home Assistant, the same automation runs entirely locally, on your hardware, on your schedule — and survives any outage that doesn't take down the house's power.
Lights as status indicators for non-light events. This is where Home Assistant earns its keep. Pulse a Govee strip red if a door sensor reports open for ten or more minutes. Flash blue when a backup job starts on your NAS. Glow green when the laundry machine's vibration sensor reports the cycle finished. The Aqara forum contributor specifically highlights that once devices publish state to MQTT, automations become straightforward — the lights become a physical notification surface for any event Home Assistant can detect. None of this works reliably with cloud-routed commands; all of it works at LAN speed.
Scene-based room presets grouped by HA Area. Group multiple Govee lights into Areas (Living Room, Bedroom, Office), then create HA scenes like "Movie Mode" (all lights 10% warm) or "Focus Mode" (100% cool white). When you call a scene, every light in the area changes simultaneously. On cloud routing, scenes cascade visibly — one light changes, then the next, then the next, over a second or two. On LAN control, all lights change in the same visual frame, which is the experience the marketing always promised.
Combine Govee with other local-control devices like the smart plugs we benchmark in Best Smart Plugs for Home Assistant in 2026 for fully offline-capable room automations. When every device speaks LAN and every command runs locally, the entire automation graph keeps working when the internet doesn't — which is what local-first was supposed to mean from the start.
Your Govee + Home Assistant Local Control Verification Checklist
The setup is done. Run this checklist to confirm everything is working, then bookmark it for re-verification after major updates.
LAN Control toggle is ON in the Govee app for every device. Verified per-device in the Govee app settings page — not assumed.
Firmware on every Govee device is the latest available. Checked via the Govee app's device settings; updates applied if any were pending.
All Govee devices appear as entities in Home Assistant. Visible under Settings → Devices & Services → (Govee LAN Control or MQTT). Count them — make sure none are missing.
Entities are assigned to HA Areas and have friendly names. No
light.govee_h6076_a1b2c3entries remaining; everything renamed to room-based identifiers that read cleanly in voice commands.Each light responds within visibly immediate latency from the HA UI. Toggle each light from the HA dashboard and confirm there's no perceptible delay. If you see cascading delays, you may still be on a cloud path.
WAN-disconnect test passes. Unplug the router's internet uplink; confirm all Govee lights still respond to HA commands. This is the only proof of true LAN operation that matters.
Govee app is no longer required for daily control. You can drive the lights from the HA dashboard, voice assistant routed through HA, or automations without touching the Govee app at all.
At least one automation is configured and working. Even a simple sunset trigger validates the end-to-end pipeline — trigger fires, condition evaluates, action executes, light responds.
Govee devices are on an isolated VLAN (or scheduled for migration). If your network isn't segmented yet, add it to your roadmap. Don't leave smart Wi-Fi devices on the same flat network as your computers indefinitely.
Home Assistant backup is configured and recent. Settings → System → Backups, with automated weekly backups enabled and stored off the HA host itself.
Re-run this checklist after every major Home Assistant version update and every Govee firmware push. Five minutes of verification is cheaper than discovering three weeks later that a silent regression broke your local control.